

Is your stunning design losing its sharp edges in production? A beautiful concept can turn into a muddy, blurred mess if the factory’s mold precision is lacking. This ruins your shelf appeal, wastes thousands in tooling fees, and delays your launch. Here is how to vet technical reality before you sign.
To judge a glass factory’s mold capability, check for 5-axis CNC machining (precision ±25 microns), the use of CAD/CAM glass-flow simulation software, and high-grade alloyed mold materials like stainless steel or aluminum bronze. True capability is proven through the sharpness of 3D embossed samples and the integration of thermal distribution sensors within the molds to ensure consistent wall thickness.
Managing custom projects requires more than just a price list; it requires an engineering partner. At our 200,000㎡ production base in Zibo, we have seen hundreds of designs fail elsewhere because the factory lacked the right mold technology. Understanding the bridge between a digital drawing and a physical glass bottle is the key to protecting your brand’s luxury status and functional reliability.
How do I assess the precision of a factory’s mold-making equipment?
In our 15 years of manufacturing, we have realized that the mold is the “DNA” of the product. If the mold-making equipment is outdated, even the best glass formula will result in a low-quality container with visible seams and uneven bottoms.
Assess mold precision by verifying the factory’s CNC calibration records and asking for their form error tolerances, which should be below 0.5-1.0 microns for high-end optics or specialized packaging. You should look for Coordinate Measuring Machines (CMM) used in post-machining inspections to guarantee that the final mold cavity perfectly matches your 3D technical drawings within a ±0.05mm margin.
The Importance of CNC Technology
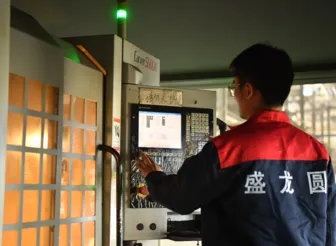
In our workshop, we don’t rely on manual lathing for complex shapes. High-capability factories use 5-axis CNC machining 1{#ref-1} centers. These machines allow for the creation of intricate internal curves that are essential for “lightweighting” glass while maintaining strength. When you visit a factory, ask to see their CNC department. If the machines are over ten years old or lack digital readouts, they likely cannot handle the tight tolerances required for modern, high-speed filling lines.
Precision equipment also impacts the “parting line”—the visible line where the two halves of the mold meet. On a high-quality bottle, this line should be almost invisible to the naked eye. This level of finish can only be achieved if the CNC machines have high-frequency spindles that produce a mirror-like surface inside the mold cavity, reducing the need for manual polishing which often distorts the design.
Verifying Mold Materials
Precision isn’t just about the machine; it is about the material the machine is cutting. In the glass industry, the mold must withstand temperatures up to 1100°C without warping. We categorize mold materials based on the production volume and the level of detail required for the design.
Comparison of Glass Mold Materials
| Material Type | Detail Precision | Thermal Stability | Mold Life (Cycles) | Best Application |
|---|---|---|---|---|
| High-Grade Cast Iron | Modéré | Haut | 100,000 – 200,000 | Standard food jars and bottles |
| Aluminum Bronze | Haut | Très élevé | 300,000+ | High-speed production / Necks |
| Acier inoxydable | Très élevé | Excellent | 500,000+ | Luxury perfume 2{#ref-2} / High-detail 3D |
| Nickel-Based Alloys | Extreme | Extreme | 1,000,000+ | Precision optical glass |
Quality Assurance with CMM Inspection
A factory that claims high precision must be able to prove it with data. We use Coordinate Measuring Machines (CMM) 3{#ref-3} to “map” the mold cavity after it is machined. The CMM probe touches thousands of points on the mold and compares them to the original CAD file. If the deviation is outside the allowed range, the mold is rejected. As a buyer like Jacky, you should ask for a “CMM Mold Validation Report.” This document is your insurance policy that the physical product will match your design perfectly. Without this, you are simply guessing at the accuracy of your supplier.
Can the supplier handle complex 3D embossed designs on glass bottles?
When our engineers look at a new 3D embossed design, we aren’t just looking at the beauty; we are looking at the glass flow. Complex textures can trap air or create “thin spots” if the mold isn’t engineered to allow for proper venting and cooling.
Suppliers can handle complex 3D designs if they use high-resolution laser engraving and Computational Fluid Dynamics (CFD) simulation software. This technology predicts exactly how molten glass will fill intricate textures, preventing the “rounding” of sharp logo edges and ensuring that air bubbles are not trapped in deep embossed patterns during the rapid cooling phase.
Laser Engraving vs. Traditional Milling
Traditional mechanical milling uses a physical bit to carve the mold. This bit has a radius, meaning it can never create a perfectly sharp “inner corner.” For complex 3D embossing—like a detailed coat of arms or fine geometric textures—we use laser engraving 4{#ref-4}. The laser can achieve a precision of 0.01mm, allowing for textures that feel premium and catch the light beautifully. If your brand relies on tactile luxury, you must ensure your factory has invested in laser-ablation mold technology.
Furthermore, laser engraving allows for “micro-texturing.” This can be used for anti-counterfeiting measures or to create a specific “hand-feel” on the glass surface. During your vetting process, ask the supplier for samples of their most detailed embossing. Check the “definition” of the edges; if they look soft or “melted,” it indicates the factory lacks the simulation tools or the engraving precision to execute your design properly.
Simulation: The CFD Advantage
One of the most common failures in custom glass is “incomplete filling.” This happens when the glass cools too quickly before it can reach the deepest parts of a 3D texture. In our Zibo facility, we run every complex design through Computational Fluid Dynamics (CFD) 5{#ref-5} software. This creates a digital twin of the molding process.
The software shows us the temperature of the glass as it hits the mold. If we see a cold spot, we adjust the “venting” of the mold. Proper venting allows air to escape, letting the glass press firmly against the texture. A factory that doesn’t use simulation is essentially using “trial and error,” which will lead to multiple failed sampling rounds and a much longer time-to-market for your brand.
Capabilities Matrix for Complex Designs
| Design Feature | Required Technology | Common Pitfall | Why it Matters |
|---|---|---|---|
| Sharp 3D Logos | Laser Cavity Engraving | Rounded or “muddy” edges | Brand recognition and luxury feel |
| Deep Textures | CFD Glass Flow Simulation | Air bubbles or thin walls | Structural integrity and aesthetics |
| Asymmetrical Shapes | Finite Element Analysis (FEA) | Stress fractures during cooling | Reduces breakage rates in transit |
| Internal Embossing | Multi-piece “Split” Molds | Visible heavy seams | Smooth, premium look and feel |
The Role of NNPB Technology
For complex designs that also need to be lightweight, we use the Narrow Neck Press and Blow (NNPB) 6{#ref-6} process. Unlike the traditional “Blow and Blow” method, NNPB uses a metal plunger to press the glass into the mold, ensuring much more consistent wall thickness. This is crucial for embossed designs because it prevents the glass from being too thin behind the embossed areas. When you are sourcing for high-performance glassware, ask if the factory is NNPB-capable. This demonstrates a high level of technical maturity and a focus on both aesthetics and durability.
What is the typical lead time for creating and testing new glass molds?
Retailers in North America and Europe work on strict seasonal calendars. We know that a delay in mold testing can cause you to miss a peak season like Christmas or Mother’s Day. Understanding the stages of the mold pipeline helps you manage your project timeline more effectively.
Typical lead times for new glassware molds range from 35 to 60 days. This includes 25-30 days for steel mold fabrication and 10-15 days for a trial production run (T1 samples). High-capability factories often use rapid CNC prototyping or 3D-printed plastic prototypes to deliver design-validation samples within the first 7 to 10 days of the project.
Phase 1: Design and Digital Prototyping
The first 7 days are the most critical. At PYGLASS, we start with a CAD/CAM glass-flow simulation 7{#ref-7}. Once you approve the digital file, we can 3D print a plastic version of the container. This allows you to hold the product, check the ergonomics, and even test how the lid fits before we spend a single dollar on cutting steel. Factories that skip this “digital-first” stage often run into design flaws that are much more expensive to fix once the metal mold is already made.
Phase 2: Steel Fabrication and T1 Samples
Once the design is locked, the actual mold making begins. This takes 3-4 weeks. A single container might require a “set” of molds, including the blank mold, the blow mold, the neck ring, and the bottom plate. After the molds are finished, we schedule a “T1 Trial Run.”
During T1, we run the machines for a few hours to produce the first “real” glass samples. These samples are used to test for technical issues like résistance aux chocs thermiques 8{#ref-8} and “annealing quality.” If the T1 samples have minor issues—like a slightly misaligned seam—we move to “T2” (Test 2) after refining the mold. A professional factory should aim to get the design perfect by T2 at the latest.
Standard Sampling Lifecycle Timeline
| Stage | Activity | Duration | Deliverable |
|---|---|---|---|
| Stage 1 | CAD Design & FEA Simulation | 3 – 5 Days | 3D Digital Model |
| Stage 2 | Rapid Prototyping (Plastic/Resin) | 2 – 4 Days | Physical Mock-up |
| Stage 3 | Metal Mold Fabrication (CNC/Laser) | 20 – 30 Days | Full Tooling Set |
| Stage 4 | T1 Trial Run & Lab Testing | 7 – 10 Days | Initial Glass Samples |
| Stage 5 | Mold Refinement & T2 Final Trial | 5 – 7 Days | Pre-Production Samples |
| Total | Design to Approved Sample | 37 – 56 Days | Ready for Mass Production |
Avoiding Common Delays
The biggest bottleneck in lead times is often the “feedback loop.” If you take 10 days to review a sample, the factory’s production slot for the T2 run might be lost, pushing your timeline back by weeks. We recommend that our clients have a dedicated technical person ready to review the “Mold Validation Report” and physical samples within 48 hours.
Also, watch out for “hidden” delays caused by PVD (Physical Vapor Deposition) 9{#ref-9} mold coatings. If your design requires a PVD coating to improve the glass surface finish, this can add 5-7 days to the fabrication stage. By being transparent about your launch date, we can help you choose the right materials and processes to fit your specific timeline.
How do I evaluate the quality of pre-production samples against my technical drawings?
When we ship a box of T1 or T2 samples to a buyer like Jacky, the evaluation shouldn’t just be “Does it look good?” It must be a technical audit to ensure the glass will perform in a real-world environment.
Evaluate samples by checking dimensions against drawings using digital calipers and volume testing (within ±2%). You must also inspect for surface defects like “chill marks” or “heavy seams” and perform a thermal distribution check. Professional factories use thermal distribution sensors 10{#ref-10} within the molds during trial runs to provide data showing that the wall thickness is uniform across the entire container.
Conclusion
Judging a glass factory’s true capability in mold technology requires looking past the showroom samples and into the engineering workshop. By focusing on 5-axis CNC precision, 3D simulation data, and advanced materials like stainless steel, you can ensure your custom design transitions perfectly from paper to glass. In 2026, the best manufacturing partners are those who combine artisanal craftsmanship with the latest in digital metrology and laser engraving. At PYGLASS, we are committed to making your vision “Safer, Healthier, and Greener” through absolute mold precision.
Notes de bas de page
1. Professional guide to 5-axis CNC machining and its applications in precision industrial mold making. ↩︎
2. Properties of stainless steel used in the manufacturing of high-quality glass containers. ↩︎
3. Introduction to Coordinate Measuring Machines (CMM) for absolute precision in metrology. ↩︎
4. How high-resolution laser engraving creates intricate 3D textures on industrial molds. ↩︎
5. Deep dive into Computational Fluid Dynamics (CFD) for simulating complex industrial processes. ↩︎
6. Overview of the Narrow Neck Press and Blow (NNPB) technology for lightweight glass manufacturing. ↩︎
7. Integrating CAD and CAM software for advanced glass-flow simulation in industrial design. ↩︎
8. The science of thermal shock resistance and how it prevents glass failure during rapid cooling. ↩︎
9. Technical benefits of PVD coatings for improving surface durability and finish in mold making. ↩︎
10. Information on different types of thermal sensors used to monitor temperature distribution in manufacturing. ↩︎